Monday, April 13, 2020

How to test LinkSpy?

If you are reading this article, you are probably interested in earning money using Url Shorteners or you already use them and wonder how to earn more? If so, you are in a good place.

LinkSpy is an Ad Server for Url Shorteners that helps to increase earnings from shorteners. It allows to use many shorteners on a single website and in a result it will assure more paid views, better rates and more money.

You already know what LinkSpy is, you want to earn more but you are still hesitating if it really works? Don't worry, we are aware that LinkSpy is something new on the shorteners market and it can bring some doubts to new users. But why not try it?

Just test it, you have nothing to lose but everything to gain!

Easy steps to test LinkSpy on your website:

  1. Create LinkSpy's account
  2. Link at least 3 Url Shorteners
    We advise to use at least 3 shorteners but depending on your traffic volume you can use more of them. If you don't know what is the best amount of shorteners for your website you should read the article: How many Url Shorteners should I link to LinkSpy?
  3. Use Full Page Script for website integration
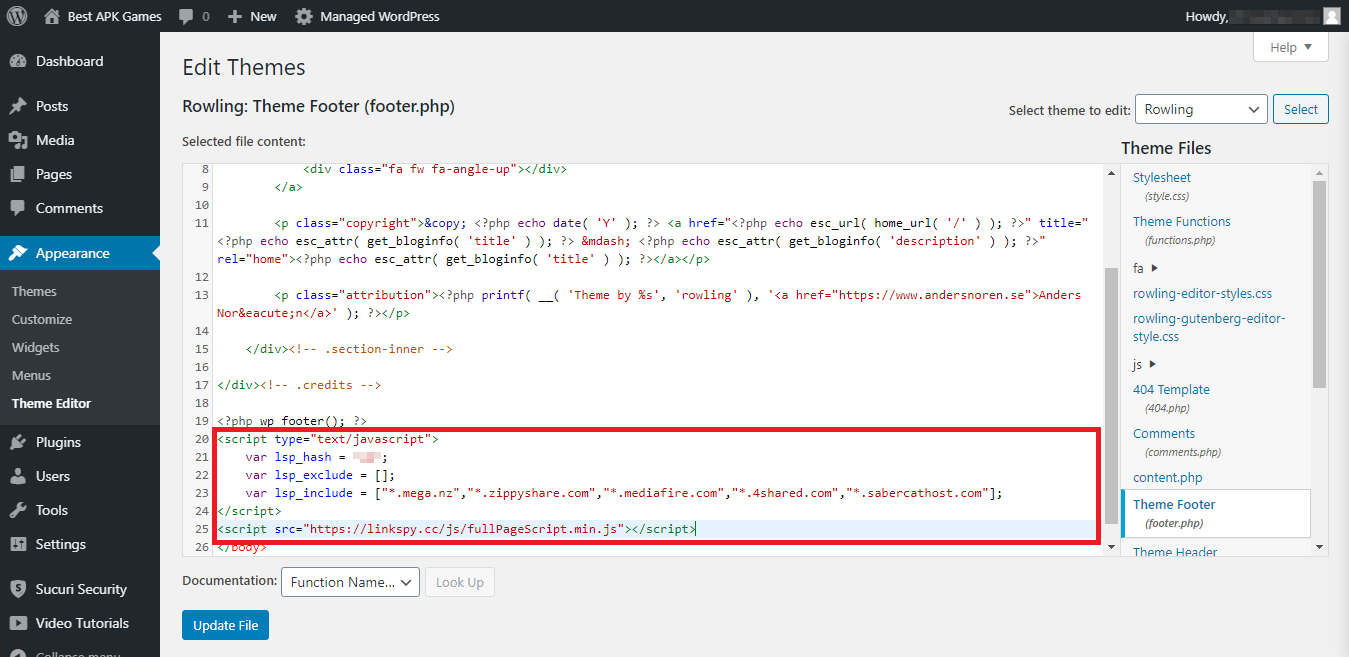
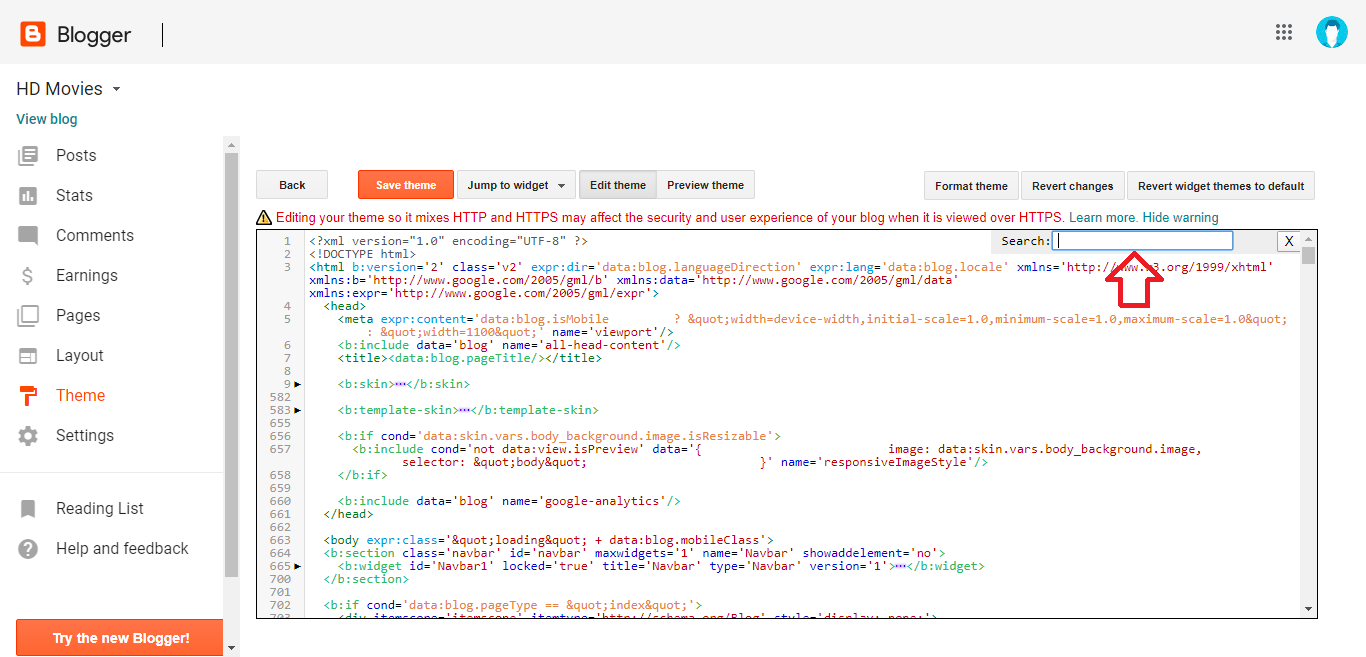
    Full Page Script is the easiest and fastest way to integrate website with LinkSpy. You can also create short links one by one and put them on your website but we don't recommend this option.Placing only few links from LinkSpy won't use its potential fully. LinkSpy monetizes many views from a single user (unique IP) so it is crucial to handle all links with LinkSpy. Otherwise you won't see any difference.
    You can find some tutorials how to use Full Page Script with Wordpress and Blogger here:
    Tutorials
  4. Test it for few days and compare the results
    After few days of testing LinkSpy, please compare your results from shorteners you used for it with statistics from single shortener that you used before. The sum of paid views and earnings should be higher than before.
  5. Share your expirience
    If you have any doubts or questions read the FAQ or ask us using contact form. If you are satisfied with LinkSpy share your experience with your friends or people who also earn using url shorteners.


Saturday, April 11, 2020

How many Url Shorteners should I link to LinkSpy?


If you are reading this article you probably already know that LinkSpy is an ad server for Url Shorteners that allows you to increase your earnings. LinkSpy rotates your users between Url Shorteners to ensure more paid views and better rates so you are obligated to add few shorteners to use it. LinkSpy supports over a dozen of Url Shorteners and also allows to add Custom Shorteners. 

Let's go to the point, 

How many Url Shorteners should you use in LinkSpy?


LinkSpy recommends to use at least 3 shorteners because this is an absolute minimum to see any progress in earnings. If you want to get better results you should use more shorteners but you have to adjust their amount to your traffic  volume. 

Adding many Url Shorteners will affect the frequency of your payouts because your traffic and money are divided between shorteners. If you have little traffic and you will use too many shorteners it can cause a situation in which you will have to wait few months for the withdrawal.

If you previously used single Url Shortener you can easily define the optimal amount of shorteners basing on monthly paid views counted by single shorteners. Please check the table below and decide what is the best option for you.

Montly paid view Shorteners no.
< 20000 3
20000 - 30000 4
30000 - 50000 5
50000 - 100000 6-8
100000 - 200000 8-12
more then 200000 12 - max

Note: the data above is only a suggestion, you can try different configurations and decide what is best for you.

We also recommend to use Traffic Optimizer, it will show how many shorteners can utilize your traffic and which shorteners have the highest rates for your users countries. Optimizer needs at least 1000 views to calculate the data.

Friday, April 10, 2020

LinkSpy.cc FAQ - Frequently Asked Questions

List of questions:

  1. Why is there a difference in statistics between LinkSpy and Url Shortener?
  2. How can I withdraw the money?
  3. What are the payment options?
  4. What is the difference between Total Views and Unique Views?
  5. Why Url Shortener doesn't count my views?
  6. Is PTC traffic allowed?
  7. Is Faucet traffic allowed?
  8. How to use LinkSpy on my website?

Why is there a difference in statistics between LinkSpy and Url Shortener?

LinkSpy shows number of all views (redirections) sent to Url Shortener's landing page. However, for each shortener to be counted, user has to fulfil additional requirements. Rules can differ in each shortener but most often they are:

  • no VPN / Proxy traffic
  • no AdBlock
  • unique IP
    • within the publisher account or
    • within the whole shortener
  • go through all the pages to destination url
    • solve the captcha
    • wait a certain amount of time
    • etc
When using LinkSpy you know exactly how much traffic you sent to each shortener. You can check which shorteners have the best conversion (number of views sent to views counted) and use them for higher earnings.

How can I withdraw the money?

LinkSpy doesn't make any withdrawals. LinkSpy rotates your traffic between Url Shorteners that you have linked to your account, so you are paid by these shorteners.

What are the payment options?

LinkSpy doesn't make any payments. LinkSpy rotates your traffic between Url Shorteners that you have linked to your account, so you are paid by these shorteners.

What is the difference between Total Views and Unique Views?

Unique views - sum of views generated by users with unique IPs, it can also be translated as a sum of unique users.

Total views - sum of all views.

Example:
If each of 3 users makes 5 views, you will get 3 unique views and 15 total views.

Why Url Shortener doesn't count my views?

Each shortener has some rules that have to be fulfiled to count the user, they can be:

  • no VPN / Proxy traffic
  • no AdBlock
  • unique IP
    • within the publisher account or
    • within the whole shortener
  • go through all the pages to destination url
    • solve the captcha
    • wait a certain amount of time
    • etc
If you have any doubts about views counting you should contact the Url Shortener directly and ask why your views are not counted.

Is PTC traffic allowed?

No.

Is Faucet traffic allowed?

No.

How to use LinkSpy on my website?

The easiest and the fastest way is to use Full Page Script from Tools section. You just have to put the JS code just before </body> tag. 
You can configure which domains should be included or excluded by the script.
If you were using Full Page Script from any of url shorteners you should remove it and keep only LinkSpy's code.

If you are using Blogger, check following tutorials:


If you are using Wordpress, check following tutorials:

Sunday, March 22, 2020

How to add LinkSpy Full Page Script to Wordpress

What is LinkSpy Full Page Script?

Full Page Script was designed for website owners. It’s goal is to translate (convert) all outbound links in your blog into LinkSpy links. Simply, with LinkSpy Full Page Script you don’t have to convert each link manually.

How to add LinkSpy Full Page Script?

Adding LinkSpy Full Page Script to your blog is divided into two parts:

First you need to generate the JS code. To do that:

  1. Go to LinkSpy.cc and login to your account

  2. In the left hand menu click on ‘URL Shorteners’ and activate the shoteners that you wish to use:


  3. Then in the left hand menu find ‘Tools’ and click on ‘Full Page Script’

  4. Use ‘Included domains’ box to list the domains of your hosting services:

    *.mega.nz
    *.zippyshare.com
    *.mediafire.com
    *.userscloud.com
    *.ul.to

    Note: Any other external link will not be included in the Full Page Script thanks to which your blog will remain user friendly.
     
  5. Copy all text from ‘Full Page Script JS code’ box.
Next, you need to add the JS code to your blog. To do that:
  1. Login to WordPress admin page by typing [youdomain]/wp-admin


  2. In the left hand menu go to 'Appearance' and click on 'Theme Editor'.


    Note: Please keep in mind that the edit option is not available for free WordPress. You need to upgrade to a premium package, or you need to host your site externally.
  3. In right hand menu find ‘footer.php’ and click on it

  4. Click on HTML text box and hit ‘Ctrl’+’f’ on your keyboard to open the search box


  5. Type '</body>' and hit ‘Enter’ to locate the body closing tag

  6. Paste the Full Page Script JS code just before the '</body>' tag.

  7. Click on the ‘Update File’ button.

  8. Go to top menu, hover over ‘Managed WordPress’ and click on ‘Flush Cache’

  9. Test links on your blog and start earning real money!
Happy money making!

How to add LinkSpy Full Page Script to Blogger

What is LinkSpy Full Page Script?

Full Page Script was designed for website owners. It’s goal is to translate (convert) all outbound links in your blog into LinkSpy links. Simply, with LinkSpy Full Page Script you don’t have to convert each link manually.

How to add LinkSpy Full Page Script?

Adding LinkSpy Full Page Script to your blog is divided into two parts:

First you need to generate the JS code. To do that:
  1. Go to LinkSpy.cc and login to your account
  2. In the left hand menu click on ‘URL Shorteners’ and activate the shoteners that you wish to use:

  3. Then in the left hand menu find ‘Tools’ and click on ‘Full Page Script’
  4. Use ‘Excluded domains’ box to exclude all domains which links should not be translated/converted (ex. Social Media):


    *.facebook.com
    *.twitter.com
    *.google.com
    *.instagram.com
    *.youtube.com
    *.pinterest.com

    Note: You don’t have to exclude your blog domain. Script will do it automatically.
  5. Copy all text from ‘Full Page Script JS code’ box.

Next, you need to add the JS code to your blog. To do that:
  1. Login to Blogger
  2. In the left hand menu find ‘Theme’ and click on it
  3. Click on ‘Edit HTML’ button
  4. Click on HTML text box and hit ‘Ctrl’+’f’ on your keyboard to open the search box
  5. Type '</body>' and hit ‘Enter’ to locate the body closing tag
  6. Paste the Full Page Script JS code just before the '</body>' tag.
  7. Click on the ‘Save theme’ button.
  8. Test links on your blog and start earning real money!

Happy money making!


Monday, January 20, 2020

How to choose the best Url Shortener?

Link shortening is one of the most popular ways to earn money online. For the last several years, we have been dealing with a significant increase in interest in this method and thus also with an increase in the number of Url Shorteners. There are several dozen different Url Shorteners on the market that compete with each other by offering different rates per countries and different amount of visits counted from the same IP in 24H period. This begs the question:

How to choose the right shortener to use all potential of my traffic?


It's not possible. Each link shortener has its limitations. One of them is the number of impressions counted from the same IP. Typically, shorteners count no more than 3 impressions and most of them count only 1 impression for 24 hours. So what happens if one user displays your links 5 or 10 times? The shortener pays only for 1 and the others are forfeited. So you lose views and money.

The same applies to rates, which, depending on the shortener and country, range from a few cents to even $ 20 for 1000 views. If you have users from one country, the matter is simple, you need to choose the shortener that pays the most for that country. But what if you have users from different countries?

How do I choose the shortener that has the best rates for all my users?


It's not possible. There is no single shortener that has the best rates for all the countries. So if you get the best rate for one country, you'll get a lower rate for another. In this way you lose money again.

So how maximize earning from shortening links?


To use the full potential of the traffic that your users generate, you can use Ad Server for Url Shorteners. It is a tool that combines several url shortener in one place and allows you to use the best features of each shortener to maximize financial results.

How does it work?


First you need to create several accounts in different Url shorteners. Then you need to connect these accounts to the Ad Server and then create short links just like in any other shortener.
Ad server automatically creates shortened links in all connected shorteners so that they can be used to direct traffic.
When the user enters the shortened link, the ad server recognizes his country and selects the shortener which has the highest rate. In addition, the ad server counts how many views were taken from the same IP. If the limit of paid impressions has been used in one shortener, ad server will take the user to another shortener and then to another and so on.
This means that you always get the best rate per country and you don't lose impressions. If you have 6 link shorteners connected then instead of 1 counted view you can have even 20 of them. It all depends on how many views your users make. If you have many impressions per 1 IP and you have users from different countries, you should definitely consider using Ad Server for url shorteners.

What are the Ad Servers for url shorteners?


There is only one tool on the market dedicated to url shorteners - LinkSpy.cc. It has all the features described above, and additionally has the ability to set your own rates for each shortener and display limits from 1 IP (capping). Most importantly, the tool is available for free. LinkSpy gets 10% of your traffic but you won't feel it anyway because thanks to LinkSpy you will earn much more.